by Jerry "SMMDigital" Conaway
| < Previous | Index | Next > |
| 337. When you apply the texture to the part, in order to enable transparency in the game, under the "Rail Sim" custom material field, you should input "TrainBasicObjectDiffuse.fx". Under the "Tx Alpha" field, put in "Transparency" | 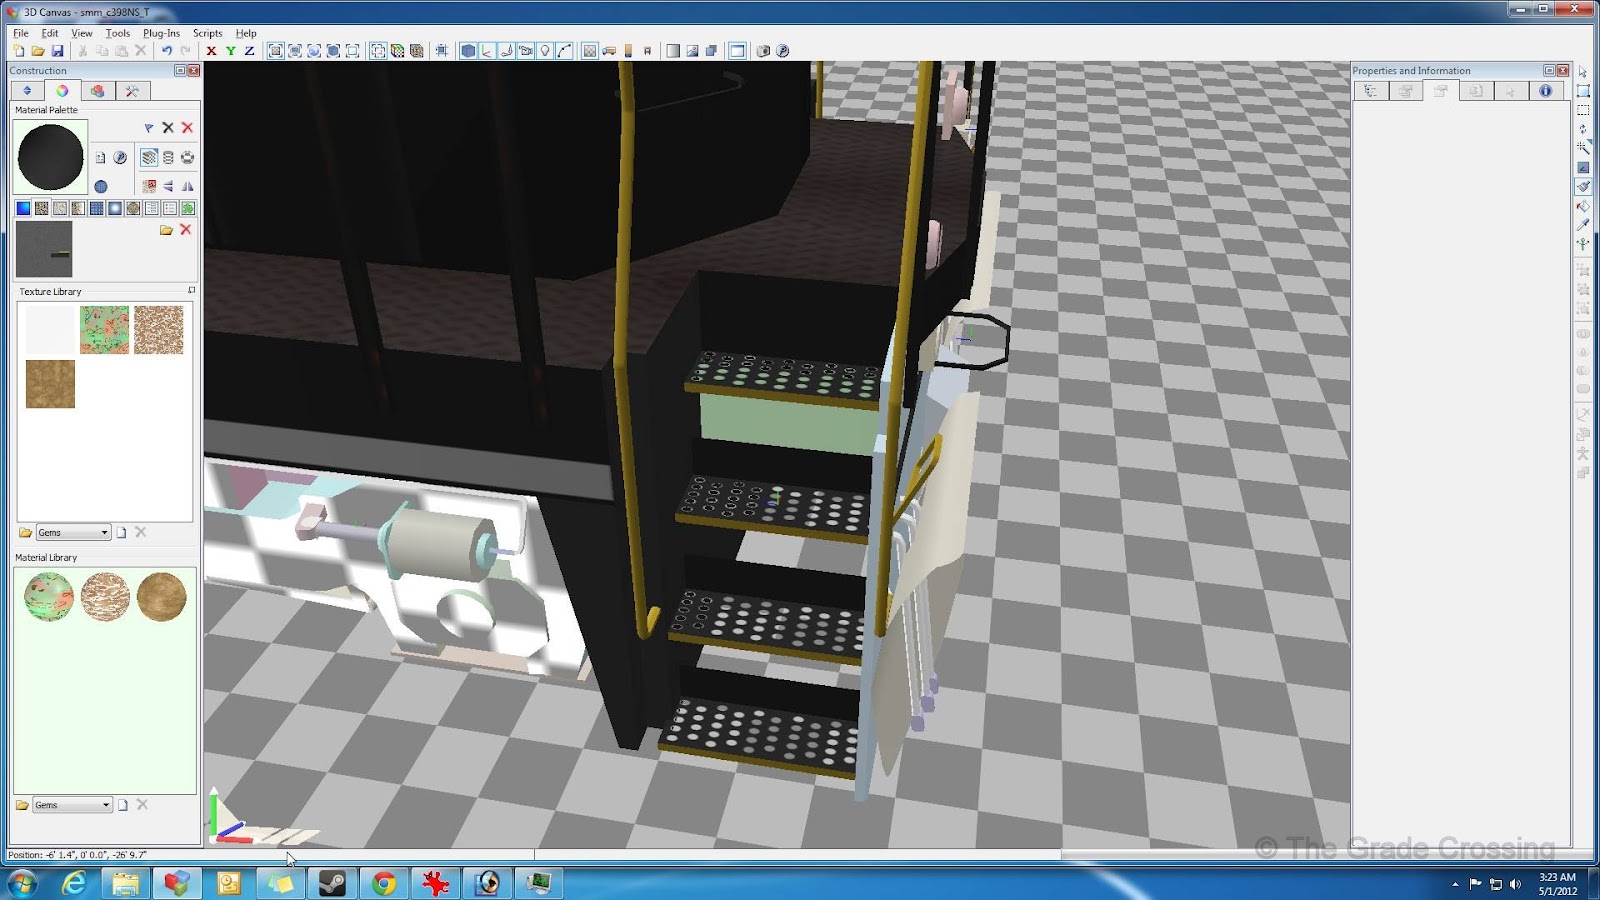  |
| 338. The numberboards that will be assigned to come on when the locomotive lights switch is activated will be painted white, but will have the "Tex" shader assigned to the "Rail Sim" Custom Materials field. This will mean that when the board is on, it will glow at full bright. |  |
| 339. Headlights and ditch lights that are considered to be off in the game will get the standard "TrainBasicObjectDiffuse.fx" shader, which is non-glow, non-gloss. However, lights that are considered to be "on" will get the "TrainEmissiveGlow.fx" shader and a bit of special treatment. The first thing we need is your standard diffuse texture. |  |
| 340. Then, you will need to create a 128x128 pixel plain texture that is the color of the light you wish to project. This texture will go into the secondary texture slot, beside the main Diffuse slot. |   |
| 341. Finally, put the "TrainEmissiveGlow.fx" shader in the Rail Sim slot under "Custom Fields" and paint the part. Notice that although it will make the part glow strongly in the game, it will not project light. That will be up to a part that we will make later. |   |
| 342. Dynamic numbering for locomotive starts out in your imaging program as four 64x64 bit mapped textures. These are place holder textures. They will be seen in the our modeling program, but will be replaced in the game by the actual locomotive numbers. I am using a 1-to-4 digit system, whereas the user can give the locomotive a number of any value between 0 and 9999. For this, I will use four placeholders. These should be named as shown in the photo. |  |
| 343. You will also need to create 10 - 64x64 textures that will hold the numbers that will be seen in the game. I need two different numbers, one black for the number boards and one white for the cab, so I will be making both colors on each texture. These should be saved as a Targa file, and they should have a unique name followed by _0 through _9 |  |
| 343. Each number texture will get an Alpha Channel that is completely black, and the number printed on each color should be completely white. In the game, this will show up as a number with no borders. |  |
| 344. Save each number as a unique Targa file, with 32-bits so that the Alpha channel will show up. |   |
| 345. Here is the entire set of numbers for dynamic numbering. |  |
| 346. Now we begin painting the placeholders on the locomotive. Start by hiding all the primarydigit faces except for "face4". | 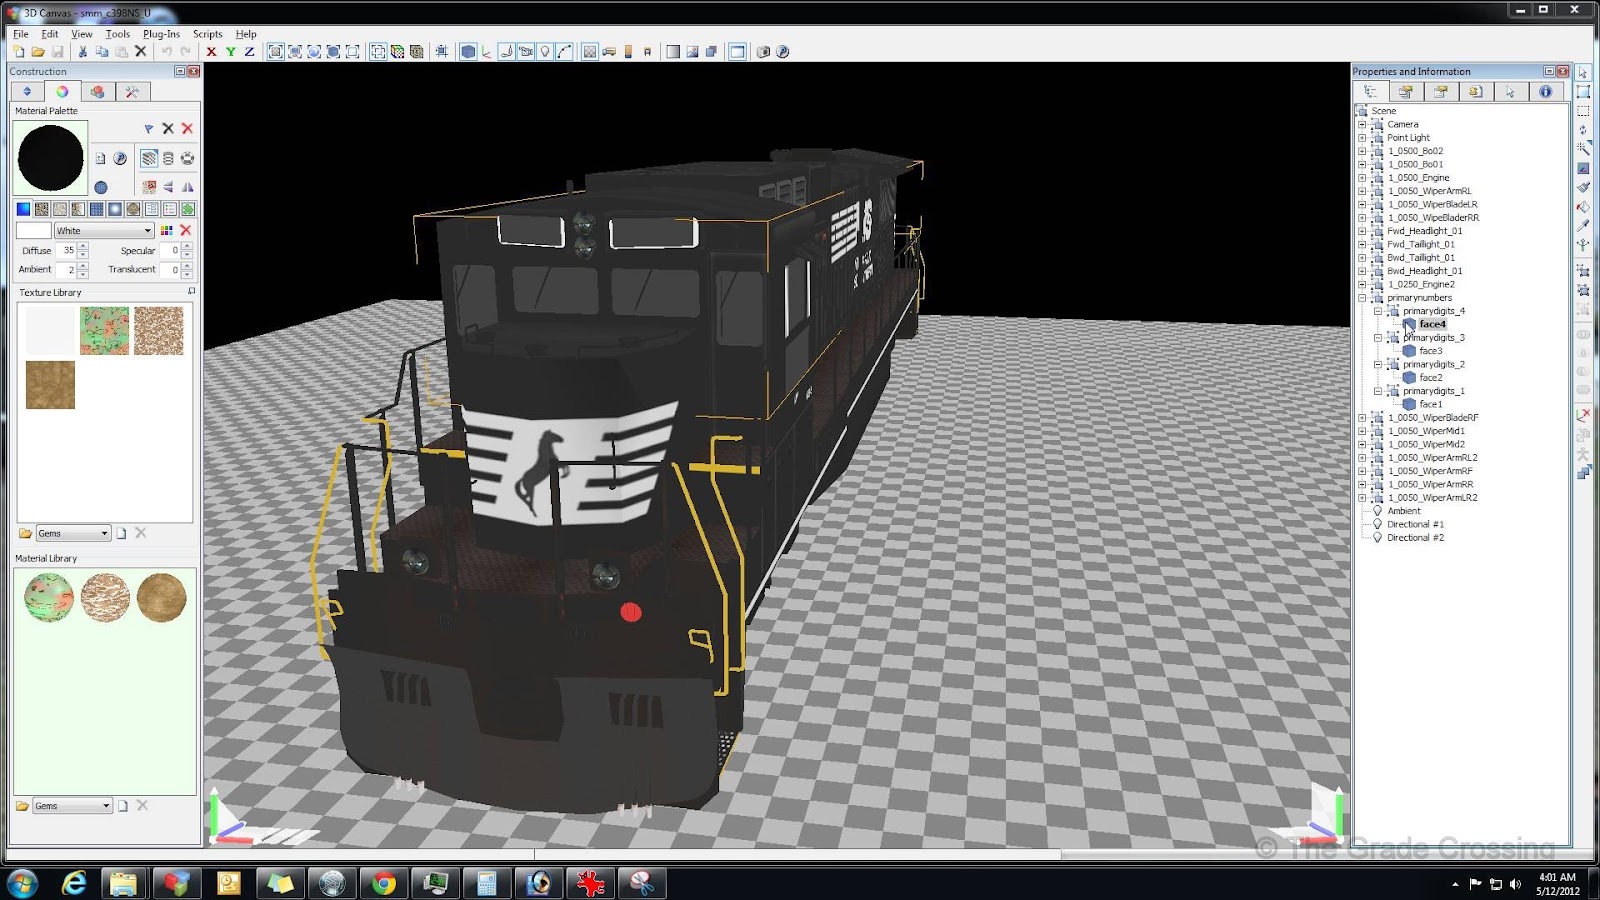 |
| 347. In your material palette, choose the primarynumber_0 as your diffuse texture. In the Custom Materials fields, you should put in the shader "TrainDecal.fx" in the Rail Sim field, and "Transparency" in the Tx Alpha field. |  |
| 347. Crop your texture so that if you were choosing from your number set, you would be choosing from the black numbers. |  |
| 348. Starting from the right side of each four number quad, paint the "0" on the first plane. Do this for each set of four numberboard numbers. |  |
| 349. Starting from the right side of each four number quad, paint the "0" on the first plane. Do this for each set of four numberboard numbers. |   |
| 350. Then move to the primarynumber_1 texture and paint the next quad over. |  |
| 351. The next quad gets treated with a primarynumber_2. |  |
| 352. And the far left number gets the primarynumber_3. |  |
| 353. Now hide the primarydigits_4 - face4 and show only primarydigits_3 - face3. Again, start from "0" on the right and fill in the other two quads. |  |
| 354. Follow the same procedure for face2 and face1 number boards. |   |
| 355. For the side number boards, which will be white, start over with the face4 quads and choose what will be shown as the white numbers on the digit textures. |  |
| 356. Again, start from the right with "0" and end it on the left with the "3" digit. Follow the exact same procedures for the face3, face2, and face1. When these are put into the game and given a numbers list, the place holders will be replaced by our auto-numbers. |  |
| 357. For our windows, we will start off by creating a 1024x1024 texture sheet. Then, we will draw in the background tinting for our side, front horizontal, and front vertical windows. One set I draw in for the outside view, which are darkly tinted, and the inside view, which are more lightly tinted. There are a couple of things that should be noted here. Number one is the texture size, which seems to be quite large for such a small item. The reason I made it so large is that it seems the larger the texture, the less compression artifacts that shows up in the glass in the game. Smaller texture sheets seem to show more "polka-dotting" and patterns when viewing. Also, the tinting color does not have to be black. It can be blue, purple, green, or whatever. I just used black to darken down the cab so it doesn't show like a nuclear bomb flash in the game. |  |
| 358. Next, and this is optional, add a layer of dirt around the edges of the windows. These things only get cleaned every 90 days or so, so you are going to see some grime build up around the edges. You could even go so far as to put in wiper strokes. |  |
| 359. Finish up by adding an Alpha channel. As shown, the brighter the red, the lower the percentage of white in the channel. This indicates a lighter, clearer window, which will be used inside the locomotive cab. The dimmer the red is a higher percentage of white, will be less translucent and used on the outside of the locomotive view. I saved this texture file as "mylocomotive_trainglass_nm" in the Targa format. The "nm" suffix tells Railworks not to compress the texture when converting it to a TgPcDx file. Compression will cause artifacting in the game. |  |
| 360. Back in 3DC, we will start the application of this window texture by giving this the "TrainGlass.fx" shader in the Custom Materials / Rail Sim field. It should be noted as well that this is NOT the shader that we would be using if we wanted raindrops and snow effects on the windshield. We will learn to do this in an advanced tutorial later on. |  |
| 361. In the Environmental Slot, the fourth slot from the right, we need to place a texture that will switch on reflection on the window texture. This texture is a simple 256x256 texture that I painted solid black and put some "noise" on it so it would be better visible in 3DC. I named this texture "mylocomotive_env_nm" and made it into a Targa file. This texture itself will not be seen in the game, but will be replaced by game-generated environment reflections. |  |
| 362. Once the main window textures are loaded, cropped, and applied with a paint brush, you see windows that are darkly tinted, transparent, and reflective in 3DC. |  |
| 363. In the game, they look even better. |  |
| 364. Now that both models, exterior and interior views, have received their coats of diffuse paint, it's time to begin adding the effects coats. First, we will apply Normal Maps. Before beginning this section, you will need to read this tutorial at GTrax sims which explains how Normal Maps are created. You will also need to acquire the Nvidia Normal Map Plugin for your imaging program or a standalone NM converter.
| |
| 365. Since the GTrax tutorial covers how to create the normal maps, I won't go into detail about that. One thing I do though that the tutorial doesn't cover is add 1% of white Noise to the black layer before I merge the layers and run the map through the Plugin. Metal that is exposed to the outdoor environment doesn't stay perfectly smooth for long. Adding noise to the background simulates small warps and bubbles that any outdoor paint job will have. |  |
| 366. For this project, I used four Normal Maps that cover the first two exterior model diffuse textures (1,2), and the first two cabview diffuse textures (4,5). Mixing normals or gloss on parts that have alpha transparency doesn't work very well, so I did not make normals for those diffuse textures (3,6). Here are samples of the finished normal maps. |   |
| 367. When you save these maps, save them as a Bitmap (.bmp) file. Example: yourloco1_norm_nm. The "nm" suffix tells Railworks not to compress the normal map as it converts it to a TgPcDx file. | 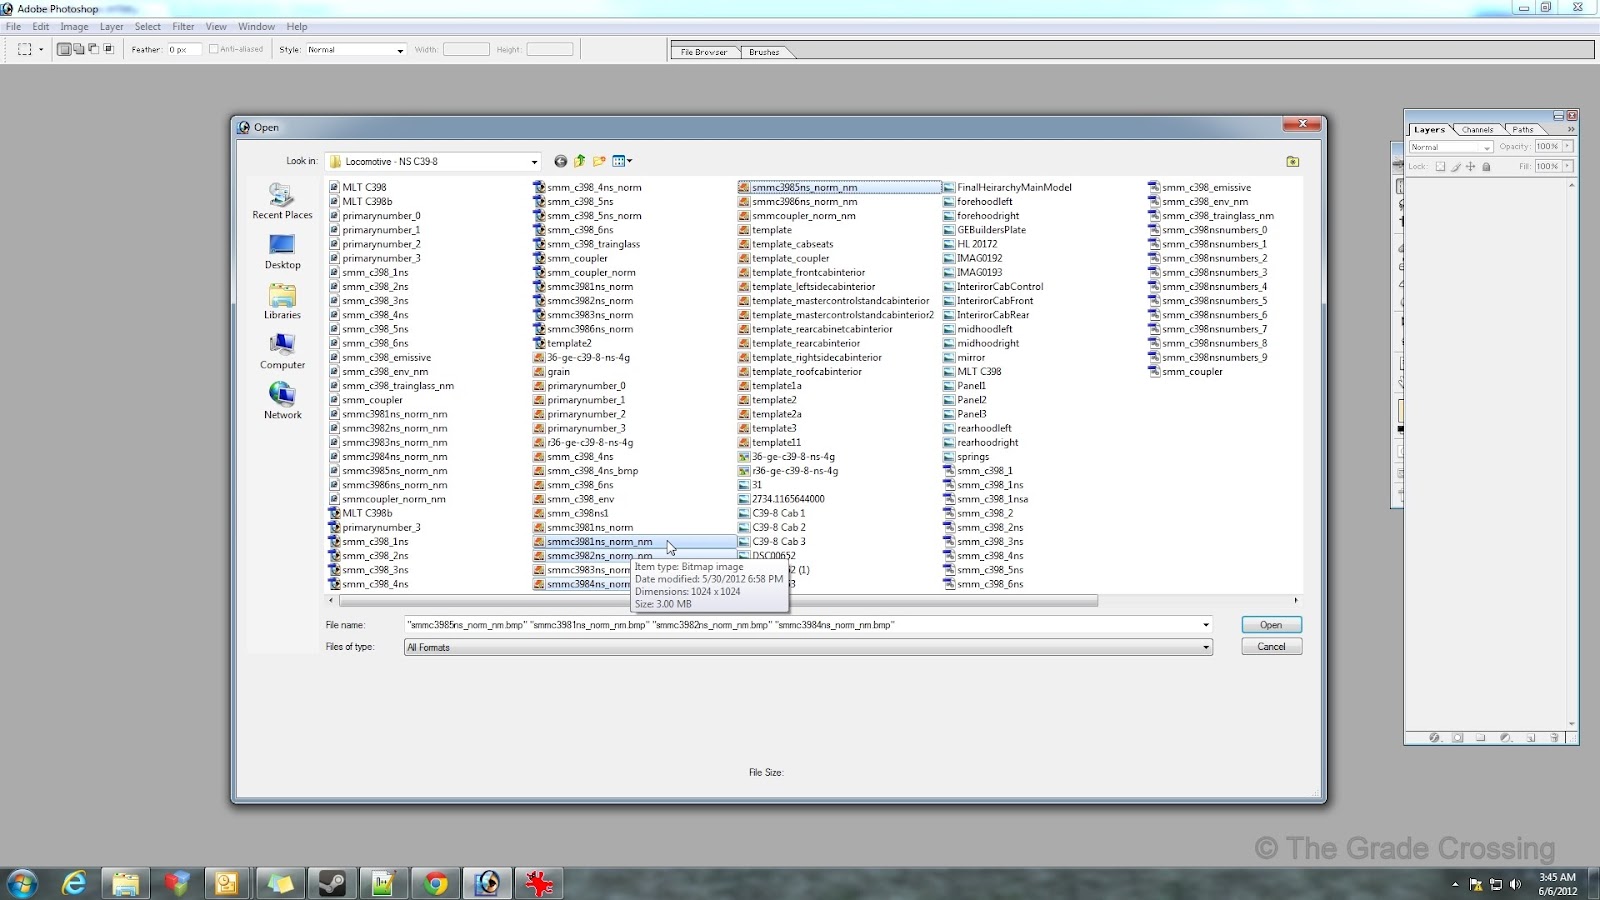 |
| 368. To apply these maps to the already painted locomotive parts, open your model in 3DC and click on a part. Now, open the third tab in the properties and information panel. This tab will show you what material slots you already have filled, as well as your Diffuse, Ambient, Specular, and Translucency settings. To the far right are the Custom Material Fields. |   |
| 369. In this tab, click on the open slot below the BumpMap symbol. From the "Open" window that pops up, select the normal map that applies to the particular texture the chosen part is painted with. Then click "Open". |   |
| 370. In the Properties and Information tab, you will see a thumbnail of the chosen Normal Map appear under the Bump Map icon. On the model itself, you should be able to see the result of the Normal Map application. |  |
| 371. In order to enable the Normal Map in the game, you need to supply a Shader. Click on the part, and under the P and I panel, go to the "Rail Sim" custom material field. If you are not planning to add any other effect to this part, then type "TrainBump.fx" into the field. If you want to add a specular or environment map, or an alpha-layer controlled gloss, then type "TrainBumpSpecEnvMask.fx" into the Rail Sim field. Your normal map is now enabled in the game. |  |
| 372. If you have multiple parts that you want to apply a couple of maps and a shader to, then an alternative to what we just did is to use the Material Manager Plug-In. Go to "Plug-Ins" in the top menu, scroll down to "Materials", and select "Material Manager". |  |
| 373. In the Material Manager window, on the left you will see a scaled down version of the hierarchy. Click on the blue box next to any part in order to activate the Current Material properties box on the right. |  |
| 374. Above the Hierarchy is a box that shows the available Custom Fields. Make sure "Rail Sim" is highlighted. |  |
| 375. In the hierarchy, check the multiple parts that you wish to apply custom properties to. | |
| 376. Now, place a check mark in the box beside "Bump", click on the "Open" button, then select the normal map you wish to use on these parts. |   |
| 377. Place a check mark in the "Field Value" box and type in the name of your Shader. Click "Apply" to and close the box. All of the parts you selected now have the custom materials and shading that you just applied. |   |
| NOTE: I keep my applications of Diffuse, Normal, Environment and Shaders as separate steps so I can see how each "coat" affects the model. However, you could take care of all of these in one step if you choose to manually paint your model with the brush. Simply fill in the main texture slot, bump map slot, environmental slot, and Rail Sim field before you paint each part to apply everything at once.
| |
| 378. Applying the Environmental Map, the small map used to turn on reflection effects, is the same as applying the normal map. Just drop it into Environment slot. The effect in 3DC will be overly dramatic, but will be smoothed out once in the game. Now it is assumed that you are going to have some degree of glossiness if you use the reflection map, so the appropriate Shader in the Rail Sim field will be TrainBumpSpecEnvMask.fx |  |
| 379. The final step to painting this locomotive is to give the loco a slight clear coat finish. The reason we do this last is because it will make the locomotive disappear in 3DC, making any further work almost impossible. |  |
| 380. In your imaging program, open up your main textures that you want glossiness enabled on, but do not have an Alpha transparency channel. (Remember, alpha transparency and alpha gloss masking will not work together) Create an Alpha channel across the entire texture and set it to 0% White (total black). At this point, no part of the locomotive will have gloss. Now, scale your alpha whiteness up to anywhere between 3% and 10% and paint only those parts on the texture that you want to have gloss. I would say this would be the main body, doors, handrails, maybe the fuel tank
When you are finished, merge all layers and save your work as a Targa file. |    |
| 381. After you have applied the appropriate Alpha to all of your textures, save them, then re-open your model in 3DC. The improved textures should instantly show on your model. Use the P and I panel to apply the TrainBumpSpecEnvMask.fx shader to your Rail Sim custom materials field, and you are finished! Repeat the steps that we just went through on your cabview and coupler models to complete the entire locomotive. | |
Now that we have painted our model, we are in a bit of a transition period. We are finished with the "physical" construction of the locomotive, but we are not quite ready to wire it up for use in the game. Right now would be a good time to export the model into the game for the first time so we can judge our efforts and correct any mistakes. First, we need to go back over our model with a fine-toothed comb and work out any issues that may prevent a successful export: - Are all part names unique? The model will not export from 3DC if this condition is not satisfied. Select the entire model and run the "Create Unique Names" plug in. - Are all group names unique? 3DC will export the model, but it will not show up in the RW Asset Editor. There is no plug-in to auto-correct this, so you will have to check this group-by-group. - Are all parts textured? Again, the model will export, but may or may not show up in the Asset editor. Select the entire model and run the "Fill Untextured" plugin. - Are all Shader slots filled and correct? Leaving a Rail Sim custom material shader field blank will not necessarily stop your model from viewing in the game. However, its not a good idea because, as a I found out when the TSX engine was implemented, if RSC makes a major change to the core game, it could render your non-shaded model incompatible. - Are the correct shaders and maps being used? Conditions that will kill the compile process in the Asset Editor: TrainBasicObjectDiffuse.fx shader used with a normal, specular, or environmental map; TrainBumpSpecEnvMask.fx/TrainBump.fx shader/s used without a normal, specular, or environment map; etc. Make sure you have the right map/shader combinations for the job. | |
| If you are pretty confident that your model is up to snuff, then it's time to Export. Select the entire model, click on "File" in the main menu, then click "Export", "Trainworks", and then "Railworks Intermediary Geometry file (.igs)". You will be prompted for a save location and a name. |   |
| We have already put LOD's into model Groups, so answer no to this question. |  |
| Now, you will need to go back to your imaging program and open ALL of the Targa and Bitmap files that belong to your model. In my case for the exterior model, that is 18 Diffuse (main) textures, 2 Normal Maps, and 1 Environmental Map. Of the 18 Diffuse textures, 3 are main model, 1 is train glass, 4 are place holders for autonumbering, and 10 are the numbers themselves. |  |
| All of the files we just opened need to be converted to .ACE format, which is the pre-export texture the Asset Editor uses. If you have an Ace conversion plug-in for your imaging program, then simply save each file in the new format. Remember when saving that Alpha channel textures save as 32-bit, non-Alpha can save as 24-bit. If your imaging program cannot save to .ACE, then you will have to use a third-party stand alone such as ToAce. |  |
| Now we need to set up our files in Railworks. Find the Source folder within Railworks, create a new folder, and name it whatever your Provider name is going to be. |  |
| As I said before, we aren't ready to run this loco in RW, so we are going to set it up as a static scenery object for inspection purposes only. Within the Provider folder you just created, create another Product folder and call it "Scenery". Within that folder, create another folder called "Clutter", and within that folder create a final folder called "textures". |  |
| Now, copy all of the .ACE files you just created from your work folder to the "Clutter/textures" folder, and copy your locomotive .IGS file to the "Clutter" folder. |   |
| Open up Railworks, and under the Tools and Doc tab, open the Asset Editor. Navigate the Hierarchy pane until you get to your "Clutter folder. Right click on the file "yourlocomotive.igs" and select "New Shape Blueprint" from the dropdown menu. In the pop-up box, select "Scenery Blueprint". |  |
| Your blueprint is pretty much automatically filled in. In the Name field near the top, put in the name of your locomotive. In the Category field, select Clutter from the list. |  |
| If there are no errors in your model, and none show up in the information pane at the bottom of the screen, then your locomotive will show up in the Asset editor. If you want to see it in game, click on the "Export" button. |   |
| Depending upon your artistic abilities, it make take a few days to several weeks to get your locomotive looking just like you want it. Take your time, because it will be a while before we work with the last physical aspect of locomotive building - Animation. |
| < Previous | Index | Next > |
Published with permission from Jerry Conaway, 2012
No comments:
Post a Comment