by Jerry "SMMDigital" Conaway
| < Previous | Index | Next > |
Now that we have our texture templates, it's time to begin filling them in. This is the part that requires a bit of artistic sense, and since I have very little of this, I can only give you very basic pointers about the mechanics of this operation. I will tell you that detailed photographs of the subject you are trying to recreate will be very helpful in this area. Also, this color chart at 3DTrains will help you in painting your locomotive in the colors you desire.
| 304. In the imaging program that you are using, create a texture that is the same size (should be 1024x1024) as the template you wish to fill in. Give the template a color that is similar but not quite the same as the main body color. You will notice in some of my photographs that I made my background color the same as primer paint. This is a bad idea, as it is much brighter than the locomotive, and if you don't get your applications just right, you will have brightly colored gaps at the seams of your parts. |  |
| Copy and paste the Template that you made for these particular locomotive parts on top of the background you just created, and give it the name Template. Now, create a layer for the part that you want to paint and place it between the base background layer and the Template. Give this layer the name of the part you will be painting. | |
| 305. You will need to make your Template layer translucent so you can see through to the work below it and use it as a guide for painting. Once you have done this, select the layer of the part you want to paint, in this case "Low Hood", and begin filling in the part. You can paint the base paint coat, fill in specular effects around the edges, and place permanent letters and numbers. |  |
| 306. Normally, we would paint the entire texture before applying to the locomotive, but for the purpose of showing how this applies to the locomotive, we will shortcut this time. After you are finished painting your part, save the texture file in the native format that your imaging program uses that will also preserve the layers (.PSD for this version of Photoshop). We will be using this file over and over again to build up many paint layers. Once you have saved this file, turn off the Template layer, merge the rest of the layers, and save the file as a Targa file with a name that is unique and associated with your locomotive project. |  |
| 307. One step we need to take before we begin painting the locomotive is to create a couple of custom Shader slots that we will need later. In 3DC, open your locomotive project and right click anywhere in the scene (other than on the locomotive). A dialogue box will open, and from that box choose "Scene Properties". |  |
| 308. Click on the "Custom Fields" tab, and in the first two slots under the "Material Custom Fields", type in the words "Rail Sim" and "Tx Alpha". There is a third word, "RailSimX", but that is for advanced arguments that will not be covered in this tutorial. |  |
| 309. Now there are a few of different ways to get the texture you just created onto your locomotive. The easiest way can be done if you have not moved any of the parts on the original template. Simply click on the part you wish to paint, which in this case is the Low Hood on the locomotive. In the third tab of the Properties and Information panel, you will see the Materials pallet. The low hood, which we have already unwrapped, shows a checkerboard pattern in the diffuse texture slot. Click on that slot. |  |
| 310. When the Open screen comes up, choose the Targa file that you saved to after painting the Template. |  |
| 311. Bada BOOM! Your part is painted! |  |
| 312. If you moved the part template around in your imaging program to get a better fit on the texture, then you can simply ReMap. Click on the faces that you want to fill-in ("3", click on face). After selecting all of the required faces, in the Shape Operations panel, click on the "ReMap" button. NOTE: Remapping only works if the part has been previously painted. If it hasn't, then you will have to use the "UVMap" button. |  |
| 313. You will need to move the points around to line up with the new part position on the template. Once that is done, click OK and your part is painted. |   |
| 314. The third way, and the way that will be used on most parts that you did not unwrap, will be to use the paintbrush. There is one advantage to using this method, which is being able to apply Shaders to each part on the spot instead of doing it later. Prepare to paint by first loading the Targa image you will be using into the 3DC Material Pallet. Do this by clicking on the Diffuse Texture button (2nd from left), then click on the "Select Texture" folder. From the "Open" window, select your texture. |   |
| 315. Once you've loaded the texture, we need to put in the name of the Shader that we will be using. This part will later have a surface-distorting Normal Map and adjustable gloss that will be supplied by an Environmental Map. To activate these in-game, we will use the TrainBumpSpecEnvMask.fx shader. In the Material Pallet, click on the "Custom Fields" tab (3rd from the right). These are the custom shader fields we created earlier. In the "Rail Sim" field, type in TrainBumpSpecEnvMask.fx. Once this shader is typed into this field, it will be applied to all future parts that we will paint during this session. |   |
| 316. Now, go back to the Primary Texture tab and click on the "Crop Texture" button. This will bring up a window that shows your entire texture. We will start off by painting one side of the nose, so I will select half of the nose texture. |  |
| 317. In the Right Edit Toolbar, click on the "Paintbrush" icon. Go back to the part, click on the first face you want to paint, hold down the mouse button, and drag the paintbrush across all faces to be painted. |   |
| 318. That places the paint from your chosen texture onto the part. Repeat this process again to paint the other side. |  |
| As far as painting your locomotive, that is pretty much it. You will be using these three processes, or a combination of them, to texture the entire exterior of the unit. But first, you have to finish the textures out. Here are all six textures, for both the exterior unit and the cab view, after all texturing has been filled in. |   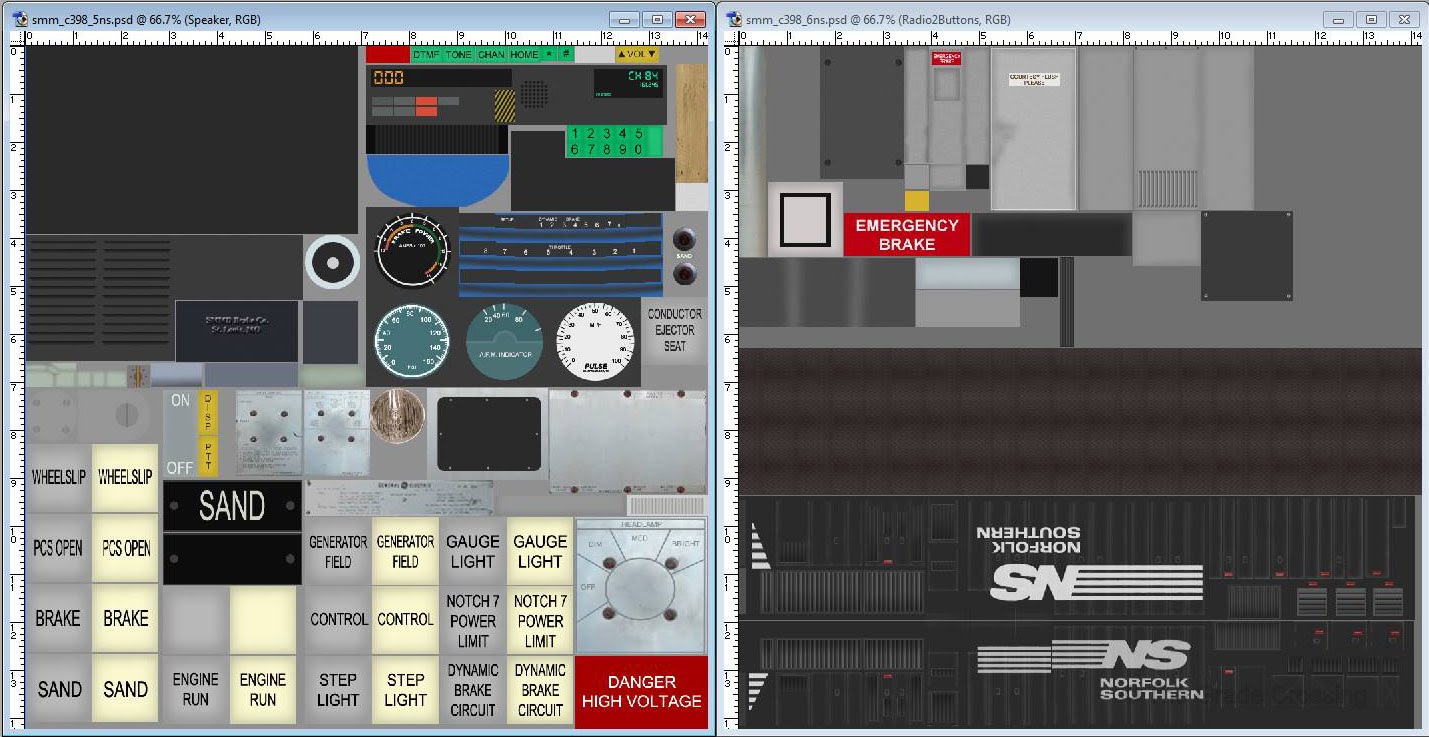 |
| 319. Like I said before, I am no Picasso, but I can give you a few tips on painting locomotive parts. For the doors, I simply placed a piece of the locomotive template that I got from Trainiax over the desired body part as a new layer. |  |
| 320. Next, I created another layer on top of this. |  |
| 321. On this new layer, I filled in the doors using a color that matched the main body. To make the edges of the doors stand out, I used an airbrush with a slightly lighter color around the edges. Vents, grilles, door handles, and raised surfaces got an even lighter color to make them stand out. |   |
| 322. The final look, transferred to the locomotive. |    |
| 323. This locomotive has "three-dimensional" doors that raise above the surface of the locomotive. In order to get these to match up with what was on the surface, I had to resize them and move them into their correct positions on the surface, directly over the painted on doors. |   |
| 324. Once the doors and vents were in position on the surface, I simply painted what was behind them on the main body on to their faces. |   |
| 325. Getting the logo to match up on both the body surface and the 3D doors was a bit trickier. First I had to ReMap this section to ensure that it was the proper size. You simply select the face that is painted, click on the "remap" button, and pull the points until the paint is in it's proper position on the face. |   |
| 326. The front face for each door had to be ReMapped to be sure that the logo lines matched up with what was painted onto the main body. |  |
| 327. Back in Photoshop, I started the Templates and layering for the rear Radiator section of the locomotive. |    |
| 328. If you like a little grime on your loco, start another layer and paint some shading and dirt in. |   |
| 329. In our imaging program, our company logo is placed onto a separate layer. But when we place it on our locomotive, we find that it's a little bit screwy, but it's nothing a little ReMapping can't fix. |     |
| 330. We apply our 3D doors, then ReMap the surfaces to match the underlying body paint. |   |
| 331. In the game, it's starting to look somewhat like a locomotive. |  |
| 332. Remember earlier when we said that parts on the locomotive that will be transparent need to have their own texture? We are ready now to begin filling in that texture. The first transparent part that we will do will be the locomotive steps. I've already filled in the color for the steps, now we will make the alpha part. Start out by creating an Alpha channel overlay in your imaging program. . |   |
| 333. White-out the entire channel. Remember that black in an alpha channel is transparent, and white is opaque. |  |
| 334. In the alpha channel, draw a rounded shape on the step and fill it with black. In this example, the black shows up as a translucent red dot to indicate you are working with Alpha. |   |
| 335. Copy the red dot you just created and paste it all over the step to simulate the anti-slip holes. |   |
| We'll use the same method for the manual brake wheel. |        |
| 336. Save the file in your imaging program's native format, then merge all layers and save the file as a 32-bit Targa. Only 32 bit texture files retain the Alpha channel information. |  |
| < Previous | Index | Next > |
Published with permission from Jerry Conaway, 2012
No comments:
Post a Comment