The CC is going (who am I kidding it has been) on a bit of a hiatus. With the upcoming UE4 update to Train Simulator sometime (we can speculate right?) September, I think it best to wait to see what improvements and conversion tools will be available.
Showing posts with label CC Progress. Show all posts
Showing posts with label CC Progress. Show all posts
Tuesday, January 13, 2015


Saturday, March 30, 2013
High mast lights for Oakland Terminal
I am in the final stages of completing a new 90ft, 11 lamp (yes 11) high mast light model. They will replace the Portland Terminal high mast lights assets I am currently using in the CC's Oakland Terminal.

Tuesday, September 25, 2012
CC Progress (2012-09-25)
I did some more work in Davis placing signals, and then moved south to do more trackwork, signals and scenery in Oakland. Its late so I will post screen shots later, but I will leave you with a new shot of Oakland Terminal:
I would have to say I am only two thirds done with this yard. You can see the start of the outermost loop, but I have the engine yard, and the Amtrak facility to complete which is buried in the "crook of the elbow".
 |
| June 2012 |
 |
| September 2012 |
Monday, August 13, 2012
Tutorial: Test Your Track - Part 2
This is part two of my tutorial on how to test stretches of track with the help of an "automated" train.
Part one of this tutorial can be found here.
In the first part I have shown you how to set up the scenario and how to add waypoints.
The second part will now deal with a problem that could affect you:
What happens if the train path leaves the line you want to test, although the waypoints are selected correctly?
Because of the way the RW/TS "Dispatcher" calculates train paths, this is a likely problem. As you can see in the following screenshots, it indeed also occured during my own testing.


10 - Search and select the Destination Marker.
Note: Markers placed in the scenario editor are only for the respective scenario and do not affect the route itself. They will not appear in other scenarios.
11 - Place the Marker onto the track your test train should run on. The location should be shortly after the switch over which the "dispatcher" wrongly reroutes your train.
12 - Give the marker a new name in the right flyout (doubleclick on the marker pole). This helps you to easily find it in timetable view.

13 - Back in timetable view, add the newly placed marker as waypoint. Make sure that the sequence of waypoints from start point to final destination remains correct. You will notice that the test train path now runs on the desired line (shown by the arrow in my example).

Always check if the test train path is set correctly. If you have ironed out all the "dispatcher's" false reroutes, your 2D map should look somewhat like this. The train path always follows the line you want to test.
14 - You can now close the timetable view.

15 - Click on the Drive button and save the scenario.
The scenario will now load and the test train will automatically begin to travel the line. You can now watch it or do something else. If there is a major fault in your trackwork, the train will derail there.
If you want to accompany your little test train, the following tip might interest you:

In the RW/TS Launcher, enable the EnableAsyncKeys function in your Settings before starting the game. If you now run a scenario, you can accelerate the time by pressing Ctrl and 1 - 5. 1 is normal time speed, 5 the normal time speed multiplied by five - the scenario runs five times faster.
I hope that this two part tutorial was enjoyable to read, understandable and helpful. If there are any questions, please drop me a comment.
Part one of this tutorial can be found here.
In the first part I have shown you how to set up the scenario and how to add waypoints.
The second part will now deal with a problem that could affect you:
What happens if the train path leaves the line you want to test, although the waypoints are selected correctly?
Because of the way the RW/TS "Dispatcher" calculates train paths, this is a likely problem. As you can see in the following screenshots, it indeed also occured during my own testing.

I want to test the southbound line, but here the "dispatcher" reroutes the test train's path over a switch to the northbound line for several miles. The next picture gives a better overview of the situation.

The left arrow marks the southbound and the right the northbound line. The automatic "dispatcher" has chosen the northbound line because it is the shortest way between two of my waypoints. To avoid this, you need to set another waypoint.

10 - Search and select the Destination Marker.
Note: Markers placed in the scenario editor are only for the respective scenario and do not affect the route itself. They will not appear in other scenarios.
11 - Place the Marker onto the track your test train should run on. The location should be shortly after the switch over which the "dispatcher" wrongly reroutes your train.
12 - Give the marker a new name in the right flyout (doubleclick on the marker pole). This helps you to easily find it in timetable view.

13 - Back in timetable view, add the newly placed marker as waypoint. Make sure that the sequence of waypoints from start point to final destination remains correct. You will notice that the test train path now runs on the desired line (shown by the arrow in my example).

Always check if the test train path is set correctly. If you have ironed out all the "dispatcher's" false reroutes, your 2D map should look somewhat like this. The train path always follows the line you want to test.
14 - You can now close the timetable view.

15 - Click on the Drive button and save the scenario.
The scenario will now load and the test train will automatically begin to travel the line. You can now watch it or do something else. If there is a major fault in your trackwork, the train will derail there.
If you want to accompany your little test train, the following tip might interest you:

In the RW/TS Launcher, enable the EnableAsyncKeys function in your Settings before starting the game. If you now run a scenario, you can accelerate the time by pressing Ctrl and 1 - 5. 1 is normal time speed, 5 the normal time speed multiplied by five - the scenario runs five times faster.
I hope that this two part tutorial was enjoyable to read, understandable and helpful. If there are any questions, please drop me a comment.
Tuesday, July 17, 2012
CC Progress (2012-07-16)
I just finished SMMDigitals great tutorial on how to make signals... from November. Kinda tells you how far behind I am on all this.


Lots left to do. I need to make an extra tall post, two head gantry, and three aspect over two (or whatever you call it).

And to prove I did the extra credit...

Thursday, July 12, 2012
Tutorial: Test Your Track - Part 1
Hi, I am "micaelcorleone" and some of you may know me from RailworksAmerica.com. Amongst other things, I am the author of several tutorials on scenario creation that you can find on RailworkAmerica.
A while ago, PapaXpress asked me if it is possible to use a train to autonomously test stretches of track and if I could help him to make this work on his CC route. I answered with a double YES. I have written a two part tutorial to show everybody how this works.
Please make sure that you already know the basics of scenario creation in order to understand everything. You can find my basic tutorials here.
Let's get started.
We want to run a train autonomously over a stretch of track. A Free Roam Scenario is the best way to make this work. Create one using the Scenario Editor function in the Main Menu.
(make sure that the scenario's start point is also the start point of the piece of track you want to test)
Assemble a consist with loco on the track you want to test.

1 - Select the Driver Icon option in the upper left flyout.
2 - Add it to the lead loco by clicking on it.

3 - Doubleclick on the Driver Icon to open the Train Properties
4 - The Train Properties will open as a flyout on the right side of your screen. You can change the name of your test train here. Leave all the other options unchanged.

Until now, all steps are the same as in the creation of a normal Free Roam Scenario. This kind of scenario normally does not feature any AI controlled trains. However, if you add instructions to a free roam train, it will behave like the AI trains in other scenario types. - Just like magic.
5 - Go into the Timetable View. At first, the train needs a Final Destination Instruction. Add it to the list.
6 - Now select your desired Final Destination from the drop down marker list in the appearing window. It should be at the end of the line you want to test.
7 - Make sure that the Allow Reversing Box is unchecked. Close the window.

8 - To define the path of the train between start point and final destination, add some Waypoint Instructions.
9 - Again, select your desired marker. Close the window.
The more of such Waypoints you add, the smaller is the risk of the train leaving the desired path.
What happens if the train path leaves the line you want to test, although the waypoints are selected correctly? What are the next steps? See it in Part 2 of this tutorial.
A while ago, PapaXpress asked me if it is possible to use a train to autonomously test stretches of track and if I could help him to make this work on his CC route. I answered with a double YES. I have written a two part tutorial to show everybody how this works.
Please make sure that you already know the basics of scenario creation in order to understand everything. You can find my basic tutorials here.
Let's get started.
We want to run a train autonomously over a stretch of track. A Free Roam Scenario is the best way to make this work. Create one using the Scenario Editor function in the Main Menu.
(make sure that the scenario's start point is also the start point of the piece of track you want to test)
Assemble a consist with loco on the track you want to test.

2 - Add it to the lead loco by clicking on it.

4 - The Train Properties will open as a flyout on the right side of your screen. You can change the name of your test train here. Leave all the other options unchanged.

5 - Go into the Timetable View. At first, the train needs a Final Destination Instruction. Add it to the list.
6 - Now select your desired Final Destination from the drop down marker list in the appearing window. It should be at the end of the line you want to test.
7 - Make sure that the Allow Reversing Box is unchecked. Close the window.
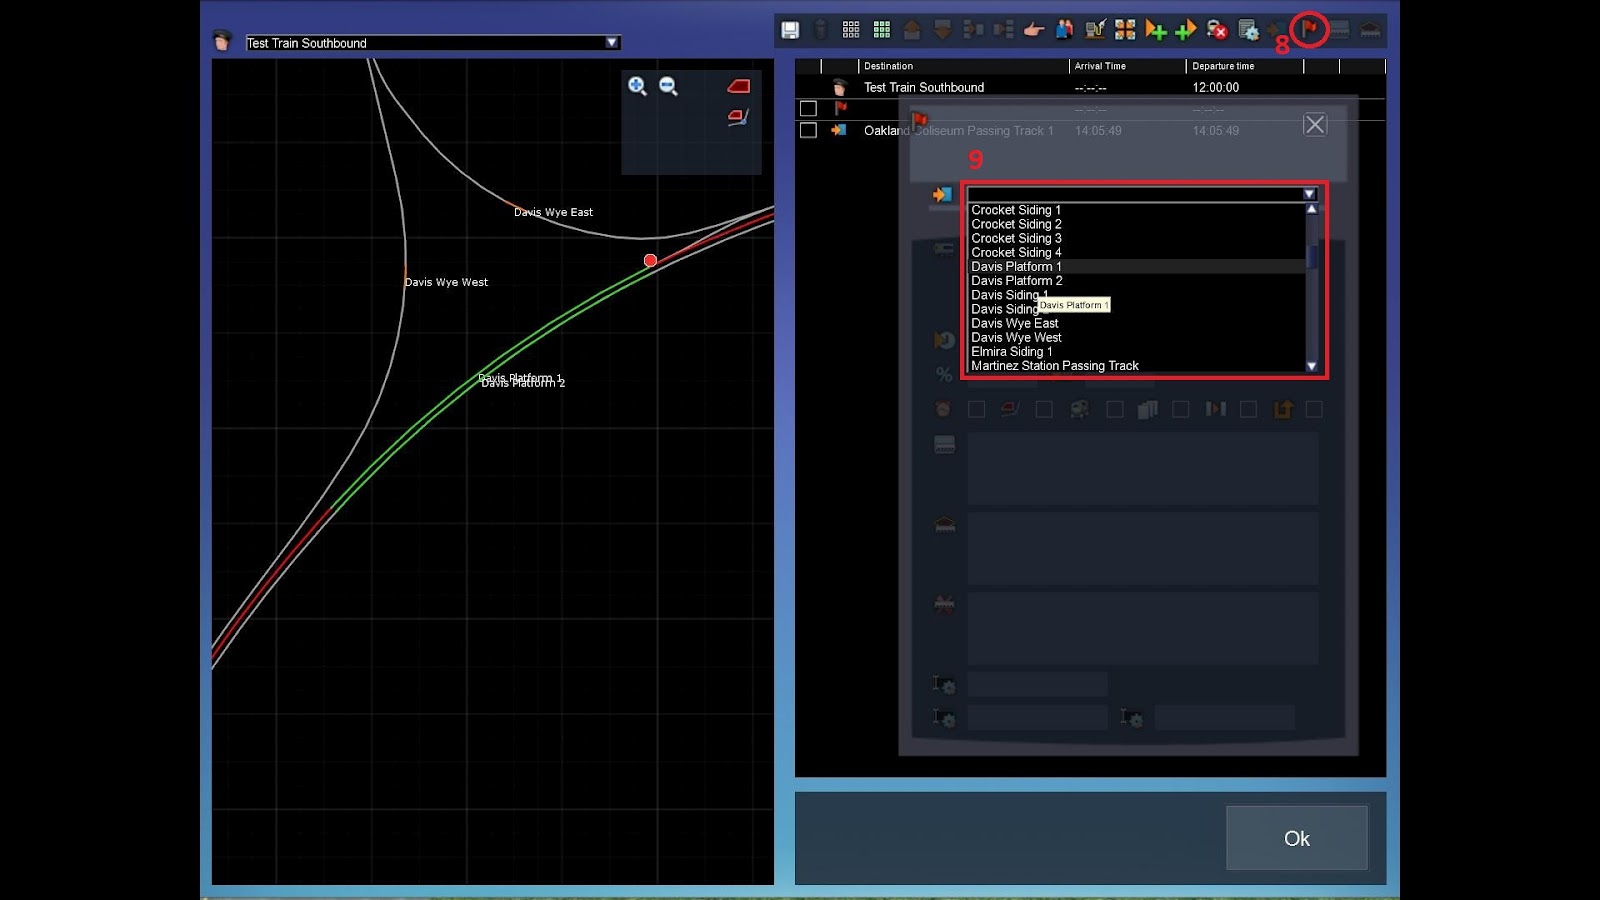
9 - Again, select your desired marker. Close the window.
The more of such Waypoints you add, the smaller is the risk of the train leaving the desired path.
What happens if the train path leaves the line you want to test, although the waypoints are selected correctly? What are the next steps? See it in Part 2 of this tutorial.
Wednesday, June 27, 2012
CC Progress (2012-06-27)
Wondering what happened to my dream route? Did the allure of 3D modeling seduce me? Did I bite off more than I can chew?
So the CC got placed on the back burner. Yes, its true. I was in a creative rut and needed to switch to something else. Well its on the front burner now, and I am happy to say that its cooking nicely. I even solicited some help from RWA member Micaelcorleone to help with some Phase I QA work and turn out some nice extras as well. If you have not read his fantastic tutorials on scenario creation on RWA you should take a moment to look through them. I approached him to use my route as the basis for creating a third tutorial on how to add AI trains to a scenario. How will this help QA my route? Glad you asked. I am a strong believer in automated testing. I use it at work constantly, and with my route I will be using the AI to run a few trains across the main line to make sure there are no hidden SBHH errors, breaks in the track, derailments due to sharp curves or bumps, and signaling (if it honors signals). It also offers an opportunity to hand my route over to someone else and see if it "works", which I am happy to report that it did.
So what has been accomplished since the last update? The mainline between Newark and Niles has been repaired. I am almost done signaling the entire mainline. A few missing crossovers which now exist. Oakland terminal has more of a yard. Nearly have the mainline has its speed limits set, and some more scenery has been placed which include passenger platforms. At the same time Micaelcorleone has been adding markers for sidings and platforms, and bringing bugs to my attention. Its nice having another set of eyes looking over my work.
Am I done with 3D modeling? Nope. I still have way too much I want to create, but as I needed to switch from route creation to something different, here I am doing the same with models.
Did I bite off more than I can chew? Of course! Looking back I would have done somethings differently, and I will be sharing a couple of these things in future posts. Don't get me wrong though. I am still having a lot of fun with Railworks, and I plan on finish all my projects.
So the CC got placed on the back burner. Yes, its true. I was in a creative rut and needed to switch to something else. Well its on the front burner now, and I am happy to say that its cooking nicely. I even solicited some help from RWA member Micaelcorleone to help with some Phase I QA work and turn out some nice extras as well. If you have not read his fantastic tutorials on scenario creation on RWA you should take a moment to look through them. I approached him to use my route as the basis for creating a third tutorial on how to add AI trains to a scenario. How will this help QA my route? Glad you asked. I am a strong believer in automated testing. I use it at work constantly, and with my route I will be using the AI to run a few trains across the main line to make sure there are no hidden SBHH errors, breaks in the track, derailments due to sharp curves or bumps, and signaling (if it honors signals). It also offers an opportunity to hand my route over to someone else and see if it "works", which I am happy to report that it did.
So what has been accomplished since the last update? The mainline between Newark and Niles has been repaired. I am almost done signaling the entire mainline. A few missing crossovers which now exist. Oakland terminal has more of a yard. Nearly have the mainline has its speed limits set, and some more scenery has been placed which include passenger platforms. At the same time Micaelcorleone has been adding markers for sidings and platforms, and bringing bugs to my attention. Its nice having another set of eyes looking over my work.
 |
| I80 near Davis |
 |
| Jack London Square |
|
| More done to Oakland Terminal |
 |
| Markers, markers, everywhere... and not a train in sight. |
Did I bite off more than I can chew? Of course! Looking back I would have done somethings differently, and I will be sharing a couple of these things in future posts. Don't get me wrong though. I am still having a lot of fun with Railworks, and I plan on finish all my projects.
Friday, October 28, 2011
If you can't find it... make it
I am using a combination of tools for this. Google Sketchup, because its UI lends itself to rapid model creation, 3DCrafter, for cleaning up, texturing and exporting the model to Railworks, and PhotoShop for painting. I am starting out by making some very simple low-poly models with simple textures (concrete is simple... right?), and after I have completed about a dozen or so, I plan on releasing them as freeware out on RWA. The first model is of the NILES letters you will see up in the hills just above the town. I couldn't make this out of a decal as it would not be seen properly from a distance.

The second object is a concrete divider. I am not sure why this hasn't been made before since its as common as vanilla. This is also the model that has (so far) given me the worst grief. There is apparently a bug in RW3 where if an object is under three meters in size it cannot be selected after placement. It took me awhile to find a solution which was to append _LOD_3 to the end of the component name. I still don't understand why it worked, but it fixed the problem.

And finally I made a sixty foot concrete pad for grade crossings. I did find a freeware set, but they were textured too dark, and then I could not find the original package to find the author to ask if I could repaint and redistribute them. So I just made my own. I will also have them in smaller lengths.

The next few projects will include: Making a block of low-ploy houses. Ditch lights for the GP15, and a set of roof top strobes.
Monday, October 24, 2011
CC Progress (2011-10-23)
I am really loving these track charts. They are a few changes when you compare them to what Google Earth is showing, but the difference is negligible. I now know what all the subdivisions are in my route, and I have updated my task list to reflect what is left to do in each of them. Here is the modified task list for Phase I and II:
Phase I
This weeks progress has been concentrated on the Niles subdivision. I completed the yard at Strong, all of the crossovers, and added the platform at Oakland Coliseum. Almost all (90%) the signals are in place now, and the spurs (80%). I just started fixing the speed limits for the line, and leveling the track, and I need to add platforms at Hayward and Centerville.
I am getting a little concerned about the frequency of SBHH errors I am seeing. In the last few days they are occurring just as soon as I load up the route, which is very new.
There are somethings I will just need to live with, first is that I will not be leveling the track to elevations that the chart shows. Its just too much work, and its actually when I laid the track to follow the terrain it ended up quiet close. I am using the charts when the elevation in the editor is questionable. The second issue is that I do not have the correct signals on the line. In many places the standard UP three aspect is used, but there is another target type three aspect which was around when SP was in charge and is still in use today. I am not talking about the elegant single target signals, this is a three light target. I need to read up on this beast. For now I will be using the in game standard signals. If I feel up to it, I will model this type and swap them our where I know they are being used.
Phase I
- Niles - Old SP main line from Niles junction all the way to Magnolia (Oakland Terminal)
- Coast - Old SP main line which I am starting from San Jose through Newark to Magnolia
- Martinez - Old SP main line from Magnolia to Roseville Yard
Phase II
- Warm Springs - SP and UP from Niles to Milpitas
- Milpitas - SP and UP from Milpitas to San Jose
- Oakland - UP main from Tracey (I am starting in Pleasanton) to Magnolia. I will include the Nile Canyon Rail Road in this sub. This work was originally in Phase I but I moved it into Phase II to balance out the work.
This weeks progress has been concentrated on the Niles subdivision. I completed the yard at Strong, all of the crossovers, and added the platform at Oakland Coliseum. Almost all (90%) the signals are in place now, and the spurs (80%). I just started fixing the speed limits for the line, and leveling the track, and I need to add platforms at Hayward and Centerville.
 |
| Entering Strong yard running North |
 |
| Strong yard from the Map |
I am getting a little concerned about the frequency of SBHH errors I am seeing. In the last few days they are occurring just as soon as I load up the route, which is very new.
There are somethings I will just need to live with, first is that I will not be leveling the track to elevations that the chart shows. Its just too much work, and its actually when I laid the track to follow the terrain it ended up quiet close. I am using the charts when the elevation in the editor is questionable. The second issue is that I do not have the correct signals on the line. In many places the standard UP three aspect is used, but there is another target type three aspect which was around when SP was in charge and is still in use today. I am not talking about the elegant single target signals, this is a three light target. I need to read up on this beast. For now I will be using the in game standard signals. If I feel up to it, I will model this type and swap them our where I know they are being used.
 |
| Signals at Jack London Square |
Saturday, October 15, 2011
I don't have to worry about the wife and the postal carrier
But my wife has to worry about me.
No our local postal worker is not drop dead gorgeous (she is as old as my mother in law...), but she does deliver the mail, and today mail made me a very happy man.


This is the complete 2002 Union Pacific Track Chart - Roseville Service Unit book. Yea I know I am showing Shasta... but it looks so cool! If no one else gets to it before I finish the CC I will definitely start it. The information inside is the real deal. Mile posts, elevations, signals, and of course track. Having this in my arsenal is going to make building my route much easier.
I don't think I have said it before, but a nod of appreciation goes to Micaelcorleone over at RWA for sending me in this direction (way back in June!), it just took me awhile to realize that I really do need this information.
No our local postal worker is not drop dead gorgeous (she is as old as my mother in law...), but she does deliver the mail, and today mail made me a very happy man.


This is the complete 2002 Union Pacific Track Chart - Roseville Service Unit book. Yea I know I am showing Shasta... but it looks so cool! If no one else gets to it before I finish the CC I will definitely start it. The information inside is the real deal. Mile posts, elevations, signals, and of course track. Having this in my arsenal is going to make building my route much easier.
I don't think I have said it before, but a nod of appreciation goes to Micaelcorleone over at RWA for sending me in this direction (way back in June!), it just took me awhile to realize that I really do need this information.
Friday, October 14, 2011
CC Progress (2011-10-14)
Wow, what a journey.
Even though I am not done with all of the tasks in "Phase I" I know I have met a milestone. Its that rush you get and you need to stop, not for any reason like its getting late, or your eyes hurt, or you need a cup of tea, but because you have that sense of finality. When you know its safe to step back an "see" what you have accomplished, and let out that sigh of relief that you made it this far.
I am proud to announce that the mainline from San Jose all the way to the start of the ever impressive (and monstrous) Roseville yard is complete.
Next on the list is the arduous task of leveling the track, and back to work I go...
hehe, not really.
I will be slowing down a bit and switching tools to work on repaints, and models (I just bough 3DCrafter). I may even play some of my other games just to keep me from burning out on route building. When I get back into it the next step will be to level the tracks. To help me with this I ordered a book of track charts so I can make the grades, speed limits, and signaling as accurate to the actual line as possible.
I'll wrap up today's post with some screen shots of the areas I just finished up with, and some I have improved on (like Oakland). I am even tempted to make a small movie just show things off a bit and to have some fun riding the Capital Corridor.
Even though I am not done with all of the tasks in "Phase I" I know I have met a milestone. Its that rush you get and you need to stop, not for any reason like its getting late, or your eyes hurt, or you need a cup of tea, but because you have that sense of finality. When you know its safe to step back an "see" what you have accomplished, and let out that sigh of relief that you made it this far.
I am proud to announce that the mainline from San Jose all the way to the start of the ever impressive (and monstrous) Roseville yard is complete.
Next on the list is the arduous task of leveling the track, and back to work I go...
hehe, not really.
I will be slowing down a bit and switching tools to work on repaints, and models (I just bough 3DCrafter). I may even play some of my other games just to keep me from burning out on route building. When I get back into it the next step will be to level the tracks. To help me with this I ordered a book of track charts so I can make the grades, speed limits, and signaling as accurate to the actual line as possible.
I'll wrap up today's post with some screen shots of the areas I just finished up with, and some I have improved on (like Oakland). I am even tempted to make a small movie just show things off a bit and to have some fun riding the Capital Corridor.
 |
| Roseville Yard (tracks seen are the mainline pass through) |
 |
| Sacramento Station |
 |
| Carquinez Strait |
 |
| Martinez |
 |
| Double Tunnel Trouble |
 |
| Oakland Terminal (some new parts added) |
Friday, September 30, 2011
CC Progress (2011-09-29)
Made some good progress in the last two nights. I finished laying the track between Davis and Sacramento, and I was surprised to find that I had at some point in the past laid quite a bit of track between Sacramento and Roseville, which included the WYE where the famous Elvas Tower once stood.
I may end up making the start of the Roseville yard the "phase I" end point instead of Sacramento station.
And just a teaser on what else I have been up to, and what my next post will be about:

I may end up making the start of the Roseville yard the "phase I" end point instead of Sacramento station.
And just a teaser on what else I have been up to, and what my next post will be about:

Wednesday, September 28, 2011
CC Progress (2011-09-27)
I am happy to report that the SBHH errors seem to be intermittent, and are probably due to loading decals. I also am proud to say that I have completely laid out decals all the way to Sacramento. I will make Sacramento the new stopping point for now (I plan to include Roseville... but that will be a monster) and hopefully complete the main line by the end of October.
The remaining tasks for this are to:
After this I will finish up work on all the small yards and branches. Then I can hand it off to MadMike to QA (which could take a month or three).
The remaining tasks for this are to:
- Fix the line between Santa Clara and San Jose
- Fix the line between Newark and Centerville (Fremont)
- Complete the line between Richmond and Benicia
- Complete the line between Davis and Sacramento
After this I will finish up work on all the small yards and branches. Then I can hand it off to MadMike to QA (which could take a month or three).
Saturday, September 24, 2011
CC and RW3
The wait is over!
RW3 looks awesome, rides well, and the tools... well I am just getting into those. The Horseshoe Curve is gorgeous, and its inspiring me to start work on the CC again.
Are there problems? A few. I am finding places on the route where I am getting new SBHH messages. The distant mountains are appearing, but are blue, not tan, and the Sun does not seem to be shining downwards at 12 noon (very strange).
My repaints have fared better, but I am seeing odd shadowing affects across them. I am not sure yet if its the model, or something other light source affect that I don't know about (like the problem with the Sun at noon).
I'll post some pictures soon.
RW3 looks awesome, rides well, and the tools... well I am just getting into those. The Horseshoe Curve is gorgeous, and its inspiring me to start work on the CC again.
Are there problems? A few. I am finding places on the route where I am getting new SBHH messages. The distant mountains are appearing, but are blue, not tan, and the Sun does not seem to be shining downwards at 12 noon (very strange).
My repaints have fared better, but I am seeing odd shadowing affects across them. I am not sure yet if its the model, or something other light source affect that I don't know about (like the problem with the Sun at noon).
I'll post some pictures soon.
Friday, July 29, 2011
CC Progress (2011-07-27)
Well the good news is that I fixed the line between Davis to Suisun. The not so good news is that I am not entirely happy with it. There is a slight S curve in the line now. Visually it looks odd since it looks like the line is kinked. I will leave it be for now, and see how it rides.

I also extended the line past Suisun striking toward Benicia. I will stop there and begin to work on extending Davis to Sacramento. Then I will finish the winding road from Emeryville to Martinez.

While laying decals and track I was surprised to find another WYE just south of the station.
Following this branch line lead me to a number of small industries, including Anheuser-Busch Co, then I found another WYE west of that, which leads south west to Vallejo and then north to St Helena deep in wine country. The possibilities seem endless with this route, and if I turn back the clock to the 50's and 60's SP would be king again... but alas, would not my route fall just as all the empires of old fell? By reaching too far across the landscape would I cause loading issues, create new and harder to fix SBHH errors, and just extend the time to complete the route? Remember this is suppose to be fun, not work.
In the software industry we call this "feature creep", and it can kill projects by starving them of resources, money and motivation. The last is what hobbyist, especially those who build models need the most. My route is already a 180 mile Goliath, and its my first route to boot. So my decision is that I will not be extending too far past Anheuser-Busch Co. Hey, how many routes in Railworks do you know have a beer industry? Like the saying goes never turn a gift beer down (unless you know its horse piss).

I also extended the line past Suisun striking toward Benicia. I will stop there and begin to work on extending Davis to Sacramento. Then I will finish the winding road from Emeryville to Martinez.

While laying decals and track I was surprised to find another WYE just south of the station.
Following this branch line lead me to a number of small industries, including Anheuser-Busch Co, then I found another WYE west of that, which leads south west to Vallejo and then north to St Helena deep in wine country. The possibilities seem endless with this route, and if I turn back the clock to the 50's and 60's SP would be king again... but alas, would not my route fall just as all the empires of old fell? By reaching too far across the landscape would I cause loading issues, create new and harder to fix SBHH errors, and just extend the time to complete the route? Remember this is suppose to be fun, not work.
In the software industry we call this "feature creep", and it can kill projects by starving them of resources, money and motivation. The last is what hobbyist, especially those who build models need the most. My route is already a 180 mile Goliath, and its my first route to boot. So my decision is that I will not be extending too far past Anheuser-Busch Co. Hey, how many routes in Railworks do you know have a beer industry? Like the saying goes never turn a gift beer down (unless you know its horse piss).
Sunday, July 24, 2011
Leave your troubles behind you... or fix them so you can forget them
Its been a busy week, both in game and out. Just before I immersed myself back into the paint can to release some RWA repaints, I did a little work on the CC. I did not finish connecting the main line between Davis and Suisun as I originally intended, but I did fix an issue that was eating away at me, which was the terrain fallout in Richmond and Martinez. It took a few hours to figure out what had happened. In Richmond the tiles stopped suddenly -000091. I know I had the terrain before because I had lain track along those tiles (now skewed due to the sudden drop in elevation). I looked through all my backup files and determined that this problem occurred before I started doing backups (have I learned my lesson yet?). Then I started looking at why several ReDem's done after that time didn't include these tiles. As it turns out, USGS was truncating the western side of the area I requested. I don't know the reason why it was behaving this way, but if I had to guess I suspect I ran into a margin or extended beyond maximum area which did not occur when I first started the route because I did not have Niles Canyon included (running eastward). I was able to work around this by asking USGS for a new BIL for an area from -122.38 to -122.00 longitude, purposely moving the coordinated west and asking for a much smaller area instead of what ReDem calculated by using the route path CVS file. This gave me tiles -000098 through -000092 and and Richmond is happily above sea level again.

The second problem in Martinez was strange but simpler to fix. Somehow I lost a whole swath of tiles and all the backups I had were from a 1/9 arc-second BIL... my route is using 1/3 arc-second, and they don't mix. I already had a BIL on hand from a past attempt to ReDem and after it did some heavy lifting, the hills were back and the shear cliffs were gone.
Suisun Bay received a little love and started filling with water. I am debating on making a new ground texture that will match the color of the bay since the muddy, marshy, and sandy textures won't work here, its almost turquoise, and if I sink the default grass texture a bit it almost matches. While I was in the area I added more decals between Richmond and Martinez almost completing the shore line track which will end up being (in my opinion) one of the more scenic parts of the route.

Before I closed the route down to back it up, I spent some time in Oakland working on the yard. There were still a few glitches in the tracks which caused SBHH errors, and a spectacular derailment where two tracks met but were not welded, but it looks like I finally fixed it all since it crashed on me months ago.
 In other news the work bench has been pretty full. Buzz has a new KCS GP30 coming out of the paint shop which needs some auto-number texture magic.

I have started doing some QA on the new BLLW Pennsylvania passenger cars (more on that later). Trainguy76 has finished modeling an A403 XP box car, and I am testing the texture mapping.

Also construction continues on the LINC.


The second problem in Martinez was strange but simpler to fix. Somehow I lost a whole swath of tiles and all the backups I had were from a 1/9 arc-second BIL... my route is using 1/3 arc-second, and they don't mix. I already had a BIL on hand from a past attempt to ReDem and after it did some heavy lifting, the hills were back and the shear cliffs were gone.

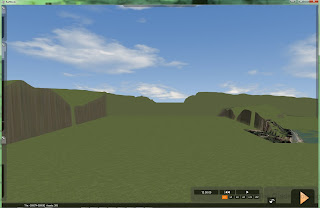
Suisun Bay received a little love and started filling with water. I am debating on making a new ground texture that will match the color of the bay since the muddy, marshy, and sandy textures won't work here, its almost turquoise, and if I sink the default grass texture a bit it almost matches. While I was in the area I added more decals between Richmond and Martinez almost completing the shore line track which will end up being (in my opinion) one of the more scenic parts of the route.

Before I closed the route down to back it up, I spent some time in Oakland working on the yard. There were still a few glitches in the tracks which caused SBHH errors, and a spectacular derailment where two tracks met but were not welded, but it looks like I finally fixed it all since it crashed on me months ago.


I have started doing some QA on the new BLLW Pennsylvania passenger cars (more on that later). Trainguy76 has finished modeling an A403 XP box car, and I am testing the texture mapping.

Also construction continues on the LINC.

Wednesday, July 6, 2011
Another reason to keep backups... debugging
A bit of an unusual CC progress update today. No new tracks down, or scenery, or fixing that gap in the mainline I spoke about in the last update. That is not to say there hasn't been any progress. I have been adjusting the terrain, which I have described in Part 1 and Part 2 and soon to be Part 3, which will be the largest article on the subject to date. Check back later this week for that.
What I really want to talk about is debugging. Its a huge subject which can be handle many different ways depending on what the problem is, your style of "divide and concur", or if you just good at deduction. Even though I am a Software Engineer by trade and work closely with QA to write Test-driven code, of which I am not going to bore you with, I tend to take a "divide and concur" approach to debugging. In this case I knew I had problem with my route which did not exist in the near past.
The issue I was seeing is that my asset count per tile went up by about 400 objects. This occurred on empty tiles well off the map as well. For those that are new to route development (such as myself) it is important to keep your asset count under 1000 or suffer from slower loading times and drops in frame rate as you enter the tile. Where did the number 1000 come from? Experience from other route makers. It is spoken about frequently on the forums.
Since I knew this was not a problem in the past (I have screen shots of when the count was normal) I started loading up my backed up route files to see when it started to happen and would prove if it was indeed something with my route or something with the game system. Fortunately this lead me to my April 26th backup. This confirmed the problem was my route, and now I had a base line to compare against. I made a (manual) clone of my current route by altering the folder name and route properties, and then adding in the April 26th route using the same technique.
My first test was against the latest changes I made to the route with the terrain. Rolling those back changed nothing, so I knew the problem was due to any of my new additions to my provider/product folder. My second test was to see the difference between the routes at the file level, of which there were several. I swapped out some files that seemed overly large or small (thinking there was some corruption in the BIN). Still nothing. The third test was to launch using the LogMate tracing application to see if there was a difference between the two routes when they loaded. This did uncover something. The bad route was trying to load from a blueprint (WCML North) which that was not formed correctly. I don't know where I got those files, though they may be related to the "Port Road" route which was by the same author. I tried to deselect the objects from my route, and then I forcefully removed any files made by from Keith Ross in my assets folder. This ended up changing the load time for the CC, but it did not fix the asset count problem.
At this point I will spend just a few more hours digging into this. If I find the cause I will share my findings so others can learn from such an unusual problem, however; there is something else to be learned about this experience which is without backups I would not have been able to do a lot of this diagnosis and it would have taken much longer to come to suspect the Scenarios folder because I would not have been able to rule out the other files and folders through testing.
Update: Mystery Solved!
There were less files in the Scenarios folder than I thought. Most of them were backup files from RWTools. I narrowed the problem down to my Scenario.bin which contained all the rolling stock I added to the route. I removed the scenario so RW would create a clean one, and noticed when I started to add rolling stock that the asset count increased for all titles. Even more interesting is that a model may take be made up of more than one asset. I confirmed this by loading up another route (NSAND) and in the yard the asset count started well over 1k and off the map it was just over 800. I don't feel so bad anymore, and I can work around this by having RW create the clean default scenario and use it only for scenery, and then add back in my older scenario and use it for fun.
What I really want to talk about is debugging. Its a huge subject which can be handle many different ways depending on what the problem is, your style of "divide and concur", or if you just good at deduction. Even though I am a Software Engineer by trade and work closely with QA to write Test-driven code, of which I am not going to bore you with, I tend to take a "divide and concur" approach to debugging. In this case I knew I had problem with my route which did not exist in the near past.
The issue I was seeing is that my asset count per tile went up by about 400 objects. This occurred on empty tiles well off the map as well. For those that are new to route development (such as myself) it is important to keep your asset count under 1000 or suffer from slower loading times and drops in frame rate as you enter the tile. Where did the number 1000 come from? Experience from other route makers. It is spoken about frequently on the forums.
Since I knew this was not a problem in the past (I have screen shots of when the count was normal) I started loading up my backed up route files to see when it started to happen and would prove if it was indeed something with my route or something with the game system. Fortunately this lead me to my April 26th backup. This confirmed the problem was my route, and now I had a base line to compare against. I made a (manual) clone of my current route by altering the folder name and route properties, and then adding in the April 26th route using the same technique.
My first test was against the latest changes I made to the route with the terrain. Rolling those back changed nothing, so I knew the problem was due to any of my new additions to my provider/product folder. My second test was to see the difference between the routes at the file level, of which there were several. I swapped out some files that seemed overly large or small (thinking there was some corruption in the BIN). Still nothing. The third test was to launch using the LogMate tracing application to see if there was a difference between the two routes when they loaded. This did uncover something. The bad route was trying to load from a blueprint (WCML North) which that was not formed correctly. I don't know where I got those files, though they may be related to the "Port Road" route which was by the same author. I tried to deselect the objects from my route, and then I forcefully removed any files made by from Keith Ross in my assets folder. This ended up changing the load time for the CC, but it did not fix the asset count problem.
How often have I said to you that when you have eliminated the impossible, whatever remains, however improbable, must be the truth?After banging on this for a couple days, I started chatting with MadMike. He is a good sounding board when I get wrapped around a problem, and this was getting to feel like "work" instead of "play" and let’s face it, I want to play after a long day of work. After listening to me walk through all my tests and the minutia of my file level exploring, he suggested that I check the Scenarios folder. Though he did not had the same problem I had with the inflated asset count, he had issues in the past with a scenario which lead to "unusual" behavior (eventually leading to a crash). It was the one folder I had not taken apart because I didn't think it had an effect on the assets of the route. What could I lose by swapping out the bad version with the good? Nothing. I cloned the route specifically so I could take a hammer to it. As it turns out the scenario (I only have the one free roam to test with) was the problem. I have three options now. I can either diagnose the dozen files in that folder and hope to find the root cause, or I can swap it out with my backup, or I can blow it away and make a new free roam scenario.
~ Sherlock Holmes
At this point I will spend just a few more hours digging into this. If I find the cause I will share my findings so others can learn from such an unusual problem, however; there is something else to be learned about this experience which is without backups I would not have been able to do a lot of this diagnosis and it would have taken much longer to come to suspect the Scenarios folder because I would not have been able to rule out the other files and folders through testing.
Update: Mystery Solved!
There were less files in the Scenarios folder than I thought. Most of them were backup files from RWTools. I narrowed the problem down to my Scenario.bin which contained all the rolling stock I added to the route. I removed the scenario so RW would create a clean one, and noticed when I started to add rolling stock that the asset count increased for all titles. Even more interesting is that a model may take be made up of more than one asset. I confirmed this by loading up another route (NSAND) and in the yard the asset count started well over 1k and off the map it was just over 800. I don't feel so bad anymore, and I can work around this by having RW create the clean default scenario and use it only for scenery, and then add back in my older scenario and use it for fun.
Monday, June 27, 2011
CC Progress (2011-06-26)
The push to connect Davis to Suisun has slowed. This is the general trend of a project whatever the size as the decals and track have been laid, and its now all in the "details". In my previous update I eluded that progress was going quickly because the terrain was level... well I spoke to soon. There has to be some elevation gain somewhere, and where else but in a yard (yea I was scratching my head on that one). There are a few along the line but all of them are smaller than what I found in Newark.

And then there is the elusive Google maps mirage of how the track is seemingly straight... but the reality is that its an ever so slight curve over dozens of miles. So when you lay out straight sections you end up welding them in odd ways to make them work. Which doesn't always work out.

I also came away with more to add to my 'to do' list. The concrete road inserts over the tracks are a bit too grimy for my liking. If I get a chance I will post real pictures to show how clean they really are. I will need to clone and repaint them. I will also be adding some new ground textures to my object list, which I will post as a follow up to my original entry on the subject.
Niles Junction also got some of my time. I added a few more signals and adjusted some of the track grades, but found more areas to work on. Some of this work developed from some new pictures I have seen of the area. Last Saturday I visited the Santa Clara Station which is home to The South Bay Historical Railroad Society (SBHRS) with my youngest son (my wife and older son went to watch Cars 2). While there I visited their extensive library. The librarian was out for the day, but I meet a gentleman who grew up around the Niles area, and happened to take several photographs of SP in action. This included several shots of Niles tower which are much more detailed than what I can currently find online. He offered to share his digital album with me the next time I happen to meet him there and had my thumb drive handy. I will make an effort to drive down this weekend and make good on his offer. With his approval I will share them online through my Picasa account.
What's next? After getting Suisun and Davis squared away track-wise, I will return to repaints for a couple weeks. Then I have my eyes set on running east from Davis to Sacramento.


And then there is the elusive Google maps mirage of how the track is seemingly straight... but the reality is that its an ever so slight curve over dozens of miles. So when you lay out straight sections you end up welding them in odd ways to make them work. Which doesn't always work out.

I also came away with more to add to my 'to do' list. The concrete road inserts over the tracks are a bit too grimy for my liking. If I get a chance I will post real pictures to show how clean they really are. I will need to clone and repaint them. I will also be adding some new ground textures to my object list, which I will post as a follow up to my original entry on the subject.
Niles Junction also got some of my time. I added a few more signals and adjusted some of the track grades, but found more areas to work on. Some of this work developed from some new pictures I have seen of the area. Last Saturday I visited the Santa Clara Station which is home to The South Bay Historical Railroad Society (SBHRS) with my youngest son (my wife and older son went to watch Cars 2). While there I visited their extensive library. The librarian was out for the day, but I meet a gentleman who grew up around the Niles area, and happened to take several photographs of SP in action. This included several shots of Niles tower which are much more detailed than what I can currently find online. He offered to share his digital album with me the next time I happen to meet him there and had my thumb drive handy. I will make an effort to drive down this weekend and make good on his offer. With his approval I will share them online through my Picasa account.
What's next? After getting Suisun and Davis squared away track-wise, I will return to repaints for a couple weeks. Then I have my eyes set on running east from Davis to Sacramento.

Saturday, June 18, 2011
CC Progress (2011-06-17)
Half way to Suisun City from Davis. It's a good break from repainting and because the area is relatively flat I don't need to make as many adjustments before adding switch overs and signals.
Current Location
View Larger Map
Friday, June 17, 2011
CC Progress (2011-06-16)
I am done laying out the Davis WYE. Put in a nice platform, some cars... still a lot to do. I was also fiddling around Newark trying to place freeway overpasses... still need to work on that. There is a lack of three lane freeways in this game (mostly two lanes).
The WYE is used by UP (once SP) and CFNR (California Northern Railroad). They have some nice paint schemes so I will likely do a few. Right now I don't have plans to model this short line for use, probably just for some AI background action. Of course this won't stop me from studying the company, and I will post more about them in the future.


The WYE is used by UP (once SP) and CFNR (California Northern Railroad). They have some nice paint schemes so I will likely do a few. Right now I don't have plans to model this short line for use, probably just for some AI background action. Of course this won't stop me from studying the company, and I will post more about them in the future.

Just west of Davis

Davis Station and WYE

Subscribe to:
Posts (Atom)